-
Xingming Road, Yanyuan, Xingtan, Shunde, Foshan, Guangdong

How to DIY Front Bumper Replacement
A Comprehensive Guide and Risk-Benefit Analysis
Summary As the cost of car repairs continues to rise, more and more car owners are considering DIY (Do-It-Yourself) repairs. As one of the most vulnerable parts of a vehicle, whether the front bumper is suitable for DIY replacement has become a concern for many car owners. This article will conduct a comprehensive analysis from 10 aspects, including the basics of bumpers, the pros and cons of DIY replacement, the tools required, detailed steps, safety considerations, cost analysis, common mistakes and solutions, electronic component handling, paint matching, and when to seek professional help, to help you determine whether it is appropriate to replace the front bumper yourself and provide practical guidance.
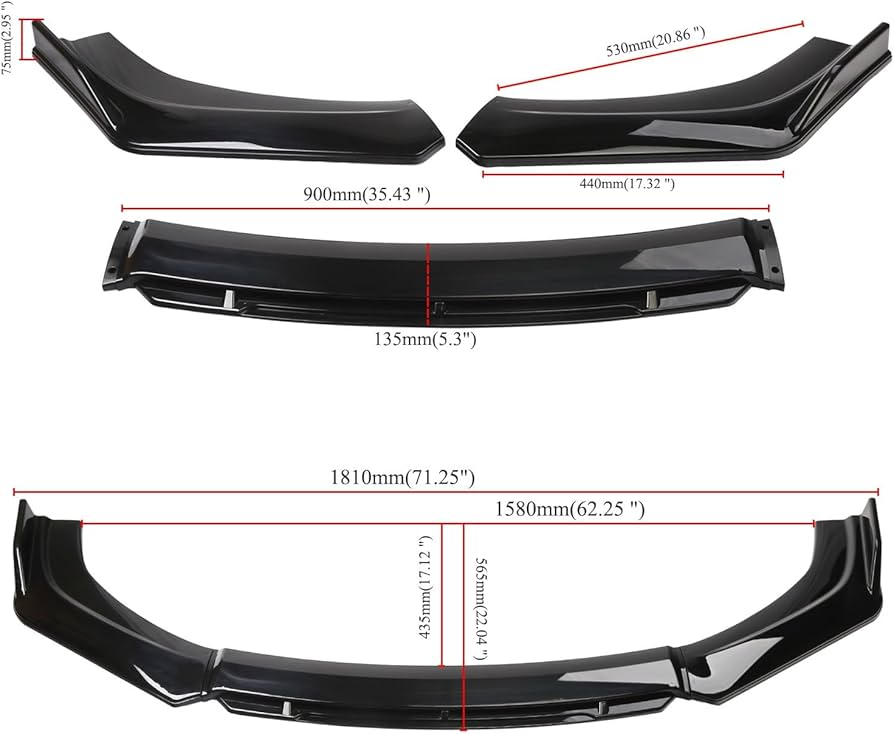
1. Front bumper basics: function, materials, and damage assessment
What is the front bumper?
The front bumper is a key protective structure at the front of the vehicle. Its main functions include:
- Low-speed collision protection: Absorbs impact in collisions below 5 mph to protect the engine compartment and chassis components.
- Integrated key components: such as fog lights, reversing radar, trailer hooks and license plate brackets.
- Aerodynamic design: The bumper design of some models affects the cooling system intake and drag coefficient.
Material type and characteristics
| Material | Advantages | Disadvantages | Common models |
|---|---|---|---|
| Plastic | Low cost, easy to form | Low strength | Most family cars |
| Fiberglass | Lightweight, customizable | High brittleness, complex maintenance | Sports cars, modified cars |
| Aluminum/steel | High strength | Heavy weight, high cost | Trucks, commercial vehicles |
| Carbon fiber | Ultra-light, high appearance | Expensive | High-performance/luxury cars |
When does it need to be replaced?
- Irreparable damage: Such as through cracks, bracket breakage or severe deformation.
- Function failure: The integrated sensor or light group is damaged and cannot be replaced separately.
- Case: A 2018 Honda CR-V owner had to replace the entire bumper because the radar bracket broke due to a scratch in the parking lot.
2. Pros and cons of DIY replacement
Advantages
- Cost savings: The labor cost of a 4S shop usually accounts for 40-60% of the total cost (for example, the labor cost of replacing an Audi A4 bumper is $500 out of a total price of $1,200).
- Skill improvement: Learn about vehicle structure knowledge and handle more complex repairs in the future.
- Flexibility: Aftermarket accessories (such as off-road style bumpers) can be selected.
Risks
- Safety hazards: The autonomous driving radar of models such as Tesla Model 3 requires professional calibration, and DIY may cause functional failure.
- Warranty issues: Self-modification of new cars purchased after 2020 may affect the power system warranty.
- Tool restrictions: Some German cars require special tools such as Torx T30 screwdrivers.
Decision recommendations:
- Suitable for DIY: 2005-2015 model year basic models without advanced driver assistance systems (ADAS).
- Recommended for professional repair: Vehicles equipped with ACC or lane keeping after 2020.
3. Tools and accessories preparation
Necessary tool list
| Tool type | Specific items | Alternative solutions |
|---|---|---|
| Basic tools | 10mm socket, Phillips screwdriver, snap screwdriver | Pliers + cloth tape (temporary) |
| Safety equipment | Jack stand (not just jack!), goggles | Wooden block (high risk) |
| Advanced tools | Torque wrench (bumper bolts require 8-12Nm torque) | Ordinary wrench (not recommended) |
Comparison of accessories procurement channels
- OEM accessories: Order through 4S stores to ensure compatibility but high prices (such as Toyota RAV4 original bumper is about $600).
- Aftermarket: CarID and other websites offer $200-400 options, and the model year needs to be checked.
- Used parts: LKQ and other dismantling parts platforms, the price is $80-150, but the integrity of the buckle needs to be checked.
4. Step-by-step replacement guide (taking the 2016 Ford Focus as an example)
Step 1: Safety preparation
- Disconnect the negative terminal of the battery (to prevent accidental triggering of the airbag).
- Use the jack stand to lift the front of the car to ensure stability.
Step 2: Remove the old bumper
- Remove the wheel arch liner screws (T25 Torx).
- Loosen the top 6 buckles (use a plastic pry bar to avoid scratching the paint).
- Disconnect the fog lamp plug (press the release lock first).
Step 3: Install the new bumper
- Reverse operation, note:
- Align the headlight gap first (leave 3-5mm expansion space).
- All buckles need to be “clicked” to confirm that they are in place.
5. Electronic components and safety system handling
Key considerations
- Radar calibration: Nissan ProPILOT and other systems need to be reset with CONSULT-III equipment after replacement.
- Wiring harness waterproofing: Seal the plug with Dielectric Grease (especially for electric vehicles).
Real case: A DIY car owner failed to calibrate the City Safety radar of the Volvo XC60, causing the automatic brake to be triggered incorrectly.
6. Paint Matching Techniques
Self-service vs. Professional Painting
| Method | Cost | Durability | Color Difference Risk |
|---|---|---|---|
| Spray Can Set | $50-100 | 1-2 Years | High |
| Professional Paint Mixing | $200-400 | 5+ Years | Low |
Recommendation: Use the original color code (e.g. Toyota 040 White Pearl requires three coats of spraying).
7. Cost Comparison Analysis
| Project | DIY Cost | 4S Shop Cost | Savings Ratio |
|---|---|---|---|
| Bumper Accessories | $200 (After-sales) | $600 (OEM) | 66% |
| Spray Painting | $50 (Self-spray) | $300 | 83% |
| Labor | $0 | $500 | 100% |
| Total | $250 | $1400 | 82% |
Note: The savings for luxury cars are more significant (e.g. BMW 4S shop labor costs $150/hour).
8. Common Mistakes and Solutions
Mistake 1: Pulling the bumper forcefully
- Consequence: Damage to the headlight bracket (repair cost +$300).
- Correct approach: First look for hidden screws (often found on the inside of the fender).
Error 2: Ignoring torque specifications
- Example: Overtightened bolts cause cracks in Honda Civic bumper.
9. When do you need professional help?
- Structural damage: Deformation of the longitudinal beam requires a frame straightener (such as a Mercedes-Benz-specific device).
- High-voltage system: Disassembly of hybrid models may touch the orange cable.
10. Ultimate advice: Your choice should be based on…
- Technical confidence: For the first attempt, it is recommended to start with a basic model from the 1990s-2000s.
- Equipment conditions: At least a torque wrench and a light are required.
- Time investment: It usually takes 6-8 hours for a novice (1.5 hours for a professional technician).
Summary DIY replacement of the front bumper can save 80% of the cost, but it is necessary to weigh the technical complexity and safety risks. For old models without ADAS, it is feasible to replace it yourself; while for new electric vehicles or luxury brand vehicles, it is recommended to hand it over to a certified technician. No matter which option you choose, sufficient prior research and preparation are the key to success.